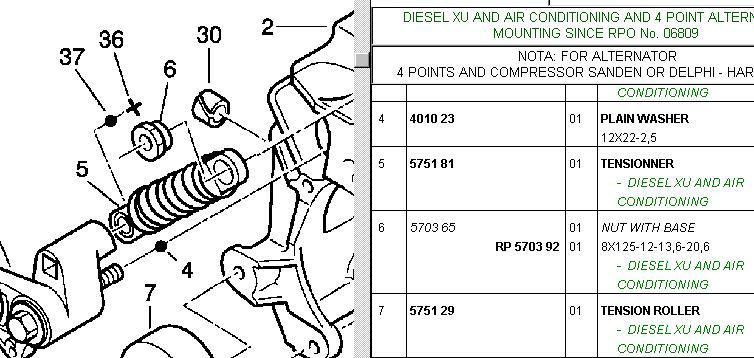
The tensioner can be replaced in-situ with minimal dismantling but access is poor. Here is how.
The correct GSF part number for the tensioner is N13179.
Essential Tools:
A 6mm ball-ended Allen key;
An 8mm Allen key;
19mm Ring Spanner;
A Dental Inspection Mirror;
A 1/4" square tool for the eccentric tensioner adjustment;
A Tensioner Retraction Tool.
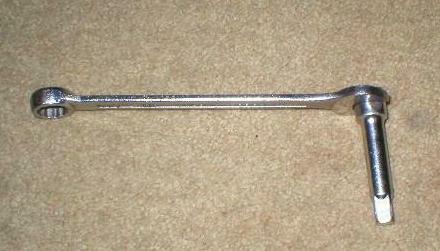
The retraction tool can be made from a short 3/8" socket extension with flats ground on the end to take a 15mm spanner. They're normally just a tad too long and a couple of mm may need to be ground off the end to ensure an easy fit into the square in the tensioner.
Mine looks like this:
Set the car on high, support on axle stands, remove the front RH wheel and the mudshield to expose the auxillary drive belt.
Disconnect the air temperature sensor on the air pipe to the inlet manifold (2.1TD only), disconnect the pipe and hold out of the way.
With reference to the following diagram:
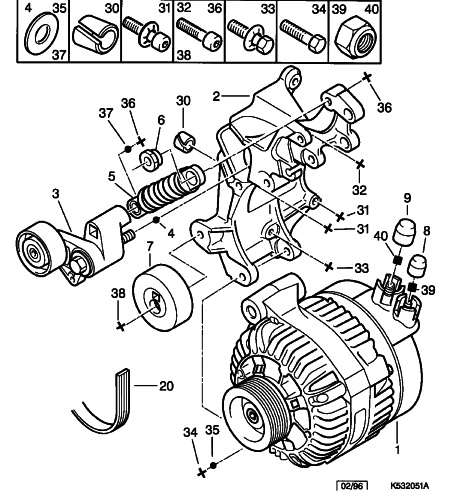
Apply the retraction tool to the spring tensioner (item 3) and rotate it fully clockwise (as if you were looking at it head-on) and pin it using a 5mm bolt in its fully retracted position. That's if you can and it is not seized. There is a hole in the tensioner body that registers with a hole in the block for the pinning. The hole can just be seen on the lower edge of item 3.
Slacken the eccentric tensioner (item 7) using an 8mm Allen key and allow it to rotate to its minimum eccentricity. Remove the auxillary belt, taking note of how it runs. Draw a sketch.
Remove the eccentric tensioner completely to improve access.
Remove the pin holding the spring tensioner in it's fully retracted position by working the retraction tool until the pin is free to slide out. Allow the tensioner to fall to it's fully relaxed position (fully anticlockwise), It should spring there on its own but may need some force if it is seized. This will take most of the tension out of the spring (item 5).
Remove the top spring stud (6mm Allen), recover the nut and spacer and don't allow it to drop into the abyss below the HP pump!!! Stuff some rag in there!
Using the tensioner retraction tool now slightly rotate the tensioner until the head of the lower spring stud lines up with the access hole in the side of the HP Pump/Alternator casting. You'll need the dental mirror to see it!
Using the short end of the 6mm Allen key, carefully engage it with the stud head (by feel as you cannot really see what you are doing because access is so poor) and start to undo the stud. Once loose, use the bell-end of the key to unscrew it but DO NOT fully remove the stud. Just undo it until it is free of the tensioner and the spring is loose.
Working from underneath, loosen the 19mm bolt attaching the tensioner to the engine block until it is loose. Do not remove the bolt fully.
Work (wriggle) the tensioner out from underneath and remove fully, ensuring you have recovered the washer between the tensioner and engine.
The new tensioner will come with a new bolt and washers. Hold the washer that goes against the engine with some grease. Offer the new tensioner into position and tighten the 19mm bolt. Ensure, as you are doing this all by feel, that you have not cross-threaded the bolt.
Position the tensioner and spring so that the lower Allen stud can be screwed back. Use again the ball-end of the key. Help here is almost essential unless you're an octopus as the tensioner needs to be held steady whilst the spring is positioned and the stud screwed up. Tighten fully.
Line up the top of the spring and replace the top stud, spacer and nut. Again, help is almost essential to keep everything lined up. Blu Tak is handy to hold the nut!
Replace the eccentric tensioner loosely. Pin the spring tensioner into the fully retracted position and replace the aux belt. It's easiest to put it on the crank pulley last of all. Mind your fingertips!!!
Adjust the eccentric tensioner using a 1/4" square drive tool and an 8mm Allen key until the belt is so tensioned that the setting pin in the spring tensioner is loose. Remove the setting pin. The belt is now correctly tensioned.
Further reassembly is a reversal of disassembly.
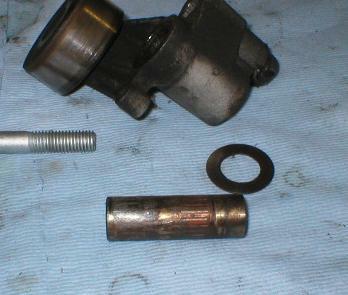
This is what happens to the tensioner bearing sleeve:


 Put an automatic tensioner on and you don't bneed a skilled person to adjust it on the production line. Time and money saved. Ditto bayonet radiator hoses