1975 Renault 6TL

This is the Forum for all your Renault Technical Questions, Problems or Advice.

Moderator: RichardW

Post Reply
User avatar
vulgalour
Posts: 228
Joined: 05 Jul 2014, 22:32
Location: Stockton-on-Tees and Kent
My Cars: 1980 Austin Princess HL
1987 Citroen BX 17RD
x 36
Contact:

Re: 1975 Renault 6TL - 02/05 Update

Post by vulgalour »

Thank you! It's making me quite happy lately.

There are certain milestones in any project, particularly one as brave/stupid as this one. Today, the milestone of lights was achieved, mostly. Mike was at the unit well before me today and called me just as I was getting stuff together to go in to let me know he'd already hooked up all the electrics, was I going in to help? Of course I was going in to help, and I was very surprised he'd already put all the wires where they needed to go.

Key in the ignition (which you turn towards yourself and is on the left of the column, counter intuitively) and see what happens. Oooh, an ignition light! We didn't have one of those last time we put a battery on the car.
Image

Soon we realised that more work was going to be needed, connections cleaned up, bulbs replaced, that sort of thing. On trying the various controls we found the wiper motor works at speeds Slow and Not As Slow, the new wiper blades were fitted when the screen was cleaned and that proved entirely satisfactory. The blower fan works, and blows both Slow and Not As Slow, so again that was deemed adequate. Sidelights and front indicators did nothing, indicator switch did nothing, headlights worked on dip and main (twist stalk for sidelights, pull down once for dip and again for main), we tried the hazard switch and one indicator worked on the rear. Here's a boring video.
Image

Rear running lights work and, after the switch came unstuck, so did the brake lights. Reversing lights were found to be purely decorative, there's no wires at all running to them and by the looks of things never were on this car so the tailgate is probably off another car, perhaps the same donor as the other metallic green panels came off as this one was also metallic green (that's at least one front door, both inner front wings, one outer front wing for those keeping tabs). Here's an even more boring video.
Image

Also learned that the passenger side lens is the wrong type but that it's because there were two manufacturers offering the same rear light with a slightly different design. Info from R6 guru Mr Reno on that one. I'm going to replace just the lens as the one fitted is not only the wrong type but also appears to be from the wrong side of the car. After some jiggery pokery and a full compliment of new bulbs we had both indicators on the back working.
Image

My brother fiddled bout with switches and switch cleaner and got the indicator stalk working and the telltale for it on the dash working. Also of note is that the dash lights illuminate, the hazard warning light works, the ignition telltale works. As yet there is no visible telltale for dip or main beam aside from a very dim red light on the far left so there's some investigation still to do on the instrument cluster, it may be bad connections, dead bulbs, or something of that sort. Odometer/Speedometer cable was also reconnected as that had come unseated at some point.
Image

The interior light works, both door switches operate with the passenger one needing a bit of a clean as it's a little sticky.
Image

Up front, everything but the driver's side indicator works. We've not found the reason for this yet, we suspect it's a bad connector or earth somewhere, we just ran out of time to investigate further. Used the old headlight bowl just to test the new bulbs and see that things worked. Rather than use the original golf ball type halogens I used a variant that has the same mounting bracket but is more like an H4 in shape. It ups the light output considerably without looking overly modern, a sensible modernisation. I've already forgotten what the bulb type is called.
Image

The most frustrating thing to discover is that the starter motor appears to have died. We did bench test it a little over a year ago but didn't then bench test it again before refitting it to the car which we should have done. It can be resurrected by a local guy who won't charge a great deal and who did a great job on the starter motor for my Princess. So we didn't get to see if the car would run today which was a shame. We did learn the handbrake definitely works and appears to work quite well.

Only a short day on the car today but a very productive and rewarding one. Seeing so much spring to life after being dormant for such a long time was really exciting, probably disproportionately so.
User avatar
vulgalour
Posts: 228
Joined: 05 Jul 2014, 22:32
Location: Stockton-on-Tees and Kent
My Cars: 1980 Austin Princess HL
1987 Citroen BX 17RD
x 36
Contact:

Re: 1975 Renault 6TL - 04/05 Lumiere

Post by vulgalour »

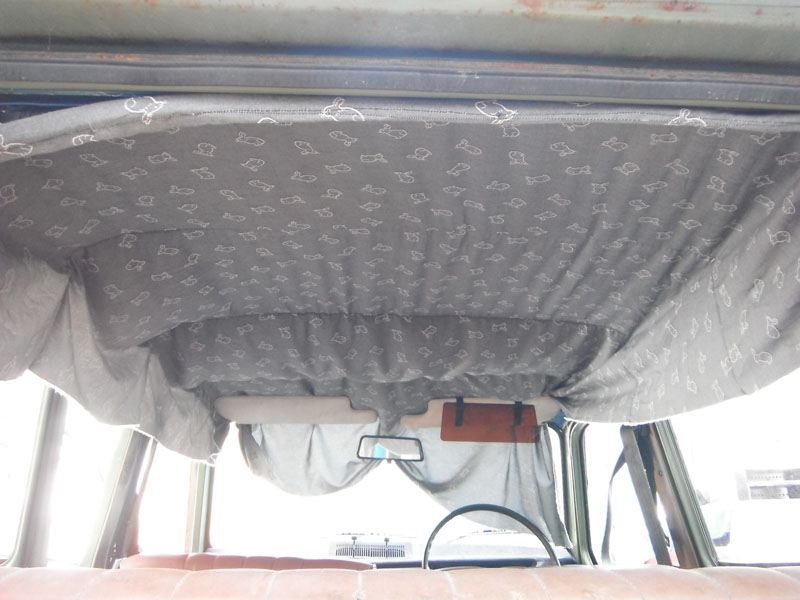
Headlining made today and first fit attempted to check everything was as it should be. This style of headlining is very easy to make, it's essentially a length of fabric with pleats in to hold the wires. The key is getting the pleats in the correct locations so you have good even tension front to back. On the whole I managed that. I salvaged the plastic strip from the old headlining that goes into the tensioning strip at the back of the roof and sewed it into the new headlining. It won't be seen when fully fitted.
Image

At the moment this is just loosely in on the wires. For the most part the tension is really good, at the back especially so. The wrinkles will disappear when I put the side tension on, a job I'm saving for when I know I don't need to do any more work with the wires that run above the headlining and the welding that the roof and passenger side gutter still needs.
Image

The front wire I've misplaced slightly, not by a great deal but by enough to cause a sag that you can't pull out. It's an easy task to relocate the wire and refit.
Image

The scariest part will be removal and refitting of the windscreen, a vital job because it's the only way to get the tension on the front of the headlining properly. It's a job I'll have to do anyway to see if I can resolve the water leak on the driver's side of the screen and deal with any rust or damage that might be hiding. If it were a laminated screen I wouldn't be so nervous about it and if replacement screens were easy to get hold of I'd just buy a new one and have the pros fit it for me.

Mike told me he got the indicator working too, it was just a duff connection.
User avatar
CitroJim
A very naughty boy
Posts: 49621
Joined: 30 Apr 2005, 23:33
Location: Paggers
My Cars: Bluebell the AX, Polly the C3 Picasso, Pix the Nissan Pixo, Propel the duathlon bike, TCR Pro the road bike and Fuji the TT bike...
x 6183
Contact:

Re: 1975 Renault 6TL - 04/05 Lumiere

Post by CitroJim »

I absolutely love the headlining :D That really is excellent!
Jim

Runner, cyclist, time triallist, duathlete, Citroen AX fan and the CCC Citroenian 'From A to Z' Columnist...
User avatar
vulgalour
Posts: 228
Joined: 05 Jul 2014, 22:32
Location: Stockton-on-Tees and Kent
My Cars: 1980 Austin Princess HL
1987 Citroen BX 17RD
x 36
Contact:

Re: 1975 Renault 6TL - 04/05 Lumiere

Post by vulgalour »

Few little jobs done today, not a huge amount, but a bit. First up, getting that old exhaust off. It was rusted up and even though the nuts came undone fairly easily the backbox did not want to let go so I just cut through the main pipe as it wasn't worth saving. The old exhaust could be sacrificed this way because I had a whole new system to go on. New on the left, old on the right. In the second picture you can see just how comprehensively ruined the old backbox was.
Image

Image

The tensioner was cleaned up and fitted complete with a new nut.
Image

Another job that wanted to be done today was fitting the new clutch cable which meant an opportunity to remove the dashboard for better access and to inspect what's what behind it. There were many dead wasps hiding behind the dashboard that were cleared away and a hint of why the scuttle has rotted out where it has. There are two holes inside the scuttle section and it's packed with foam. When I cut out the rot on the passenger corner I will get as much of this foam out as I can in part because I don't want to set fire to it but also to get rid of the problem. It would also appear from rust staining that even though the water has been appearing on the driver's side it could well be getting in on the passenger side.
Image

Little bit of history laminated to the parcel shelf and a hint of the travels the previous owner has been on, or intended to make. Take the National Express when your life's in a mess, it'll make you smile. All human life is here from the feeble old dear to the screaming child...
Image

Anyway, enough Divine Comedy for now, here's what little there is behind the dashboard. With it all out there was a delightful lack of bodge or wiring danger. With gentle persuasion the hot/cold lever was made to move again, spending a long time just wiggling it side to side until now it moves with the proper lever attached. The fan control panel has a smear of some sort of gunk all over it that was hiding behind the decorative plate, which seemed a bit odd. All of the dead wasps were vacuumed out from behind the dashboard too.
Image

I was very careful with the dashboard, it's 40+ year old plastic and rare in right hand drive format, I'm highly unlikely to find another. It will be a lot easier to clean up properly out of the car.
Image

I could now inspect the bulbs too. At least one appears to have blown so I'm just going to replace all 5 of the bulbs with new ones. I notice there are what look like two empty sockets in the white section of the cluster, there doesn't appear to be anything that fits in them and I'm not sure if that's by design or not. I'm also uncertain if this car even has a dip/main telltale.
Image

The bulbs are push-fit into little holders. I can't imagine these are any fun to change with the dashboard fitted.
Image

Happily, I managed to resolve the issue with the sagging headlining section without doing any sewing. In the roof sides there are holes that the tensioning bars slot into and at the front there are two identical holes set close together. I'd just put the bar into the wrong hole, fitting it in the proper hole put a healthy amount of tension across the entire headlining.
Image

Image

The clutch cable was mostly fitted, Mike spent quite some time in the footwell dealing with the typical French issue of clutch pedal clips. The gearbox end hasn't been connected yet, it may be easier to remove the starter motor with it sitting loose.
User avatar
vulgalour
Posts: 228
Joined: 05 Jul 2014, 22:32
Location: Stockton-on-Tees and Kent
My Cars: 1980 Austin Princess HL
1987 Citroen BX 17RD
x 36
Contact:

Re: 1975 Renault 6TL - 10/05 Update

Post by vulgalour »

Last night, in readiness for a few hours of Renault repairs today, I got the dashboard and sunvisors into some soapy water so they can go back in sooner rather than later. It was a little bit grim.
Image

Caretaker Kes had already done a cracking job on the brushed metal trim on the dash. All the plastics, however, were covered in dust and mud and that grime you get from someone smoking in a car for a very long time. Didn't realise how smelly things were until yesterday when we came back to the house and it stank of stale tobacco just from having the dashboard in the living room for a few hours. Nasty. All clean now, happily.
Image

Image

While I do still have the cowling that goes under the steering wheel, it is in poor condition. Historic repairs and damage to the screw-tubes are the main problem which can probably be resolved with suitable glue and scraps of plastic. It's an item on my Would Like list, but not vital.

Today I intended to get the passenger side gutter sorted out and ready for filler and paint. I got as far as the first stage of trimming back and tacking so I can build the repair sections where needed when the welding gas ran out. That was quite annoying because until I've repaired the roof there's a few jobs it holds up. The headlining can't be fitted until the roof is repaired, which also means the windscreen can't come out to have the leak sorted and the dashboard has to wait a bit longer before its refitted. Still, it's a bit of progress and a bit of rust removed, just got to wait on the new gas bottle being ordered and delivered now. The roof this side isn't quite as bad as I'd expected, I should only need a couple of very small pieces of new metal let in where the old has dissolved.
Image

There wasn't much point doing anything engine-wise either, we've been unable to contact the starter motor refurbisher and rather than having parts lying loose about the place it seemed more sensible to just leave things as they are. I didn't really have the time spare today to do the exhaust or brakes so I looked at the smaller jobs and settled for one of the important ones, namely replacing the 10 fixing bolts for the ball joints with nice new proper ones and nyloc nuts. I can't put the bolts in the other way up as they won't physically fit, the new ones do clear everything as far as I can tell. The old improper fixings that came with the new ball joints were so ill-suited that some had already started to work loose and one had bent, particularly alarming considering the car has only been pushed around the unit at walking speed since fitting them. The quality (or lack thereof) of the supplied fixings concerns me when it comes to the quality of the ball joints themselves, time will tell on that front I suppose.
Image

Image

There weren't really any quick jobs to do after that and I had other things that needed doing so I just had a tidy up and called it a day. I'll likely not be working on this again now until next week. There's an awful lot of mud coming from somewhere under the car, every time I do anything another massive amount of dried out mud appears on the floor.
Image
User avatar
Pug_XUD_KeenAmateur
(Donor 2018)
Posts: 1168
Joined: 22 Apr 2013, 17:24
Location: South Midlands / M4 / M5
My Cars: 405 naD Est
x 232

Re: 1975 Renault 6TL - 12/05 Update

Post by Pug_XUD_KeenAmateur »

just to say am luving the story, even though I'm not really a Renault fan. Nice to see something so unusual and unloved getting the attention such a solid car deserves.

I guess the fact that the thread's had nearly 5,000 views must mean that there's plenty like me who feel similarly

Good luck!
Puxa
User avatar
Stickyfinger
(Donor 2016)
Posts: 10435
Joined: 28 Mar 2013, 21:05
Location: Somset my lovleee
My Cars: Xantia V6 ACTIVA 3ltr 24v Manual p1
Xm 2.1TD Ph2 Exclusive
AX, little Daffodil
SAXO White Mk1. Sally
x 1289
Contact:

Re: 1975 Renault 6TL - 12/05 Update

Post by Stickyfinger »

I guess the fact that the thread's had nearly 5,000 views must mean that there's plenty like me who feel similarly
there are
Alasdair
Activa, the Moose Rider
3x C5x7 Steering racks and counting
BenC5HDi
Not Mike
Posts: 588
Joined: 30 Nov 2015, 20:21
Location: Around Berkshire
My Cars: '07 Peugeot 207 1.4 "Sport" (Ha!)
'04 Berlingo Multispace 2.0 HDi with a 123BHP remap
x 45

Re: 1975 Renault 6TL - 12/05 Update

Post by BenC5HDi »

Most definitely! I'm no Renault fan either but I'm waiting with baited breath for the next installment :)

Sent from my SM-N9005 using Tapatalk
Hell Razor5543
Donor 2023
Posts: 13743
Joined: 01 Apr 2012, 09:47
Location: Reading
My Cars: C5 Mk2 VTX+ estate.
x 3007

Re: 1975 Renault 6TL - 12/05 Update

Post by Hell Razor5543 »

Snap!
James
ex BX 1.9
ex Xantia 2.0HDi SX
ex Xantia 2.0HDi LX
Ex C5 2.0HDi VTR
Ex C5 2.0HDi VTR

C5 2.2HDi VTX+
Yes, I am paranoid, but am I paranoid ENOUGH?
Out amongst the stars, looking for a world of my own!
User avatar
vulgalour
Posts: 228
Joined: 05 Jul 2014, 22:32
Location: Stockton-on-Tees and Kent
My Cars: 1980 Austin Princess HL
1987 Citroen BX 17RD
x 36
Contact:

Re: 1975 Renault 6TL - 12/05 Update

Post by vulgalour »

Ask and you shall receive... eventually!

29th May 2016
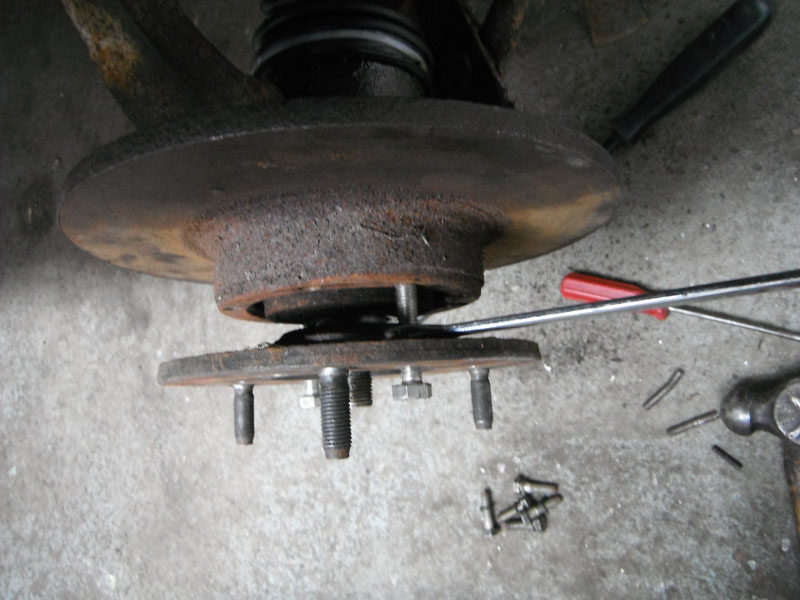
Today it was decided to make a proper effort on the front brakes.  Luckily, my brother turned up because it was one of *those* jobs as it happens.  Is there a reason French cars have to have daft brake set ups?  It's really annoying.  The front discs on the 6 are sandwiched between the two halves of the hub.  It's a very silly design and does not make changing discs easy, I was not happy about this job.  The wording in the Haynes book was also less than good (as has come to be expected of it) so some improvising had to happen.  The advise is to remove three of the disc retaining bolts and put in some longer bar and then the bolts to push the two halves of the hub apart.  You can't use a hub puller as there's nothing for the arms to attach to and you have to split the hub to get the disc out.
 
We started by trying out some what should have been toughened bolts with the heads chopped off in place of the rod suggested in the book.  That just resulted in a small amount of movement and bent threaded bar.
Image
 
Then we found some better, longer bolts and some nuts and devised a method that actually worked.  We removed all of the disc retaining bolts so it could be pushed back off the hub face, then put a longer bolt through with a nut on the back.  Three bolts were used in total to push the hub apart, it worked very well.  When the bolts proved to be a little too short we improvised using some closed-end wheel nuts that had a flat seat one side and a dimple the other, rendering them perfect for the job.
Image
 
Then one of the replacement bolts decided it didn't like being threaded any more so we had to rejig with just two.  Much slower going and with a great deal of care taken but we did get there in the end.
Image
 
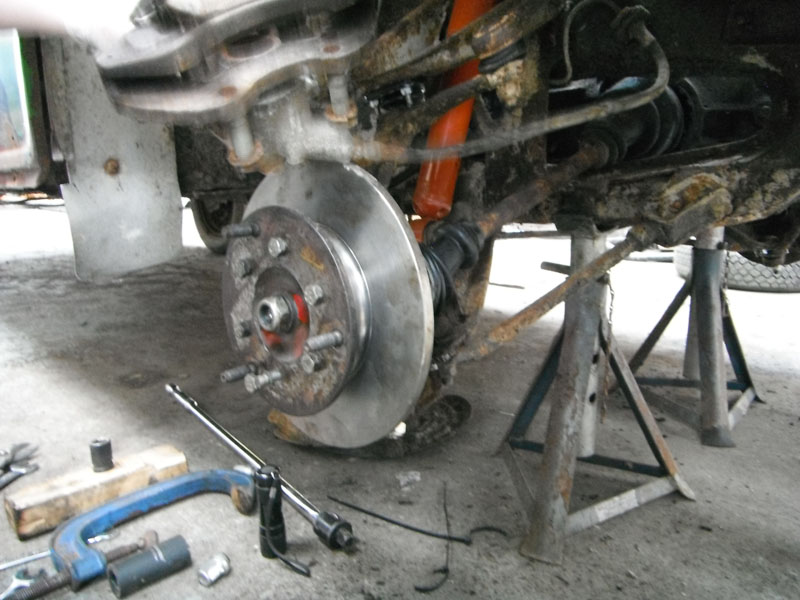
With the outer half of the hub off it's really easy to replace the disc but we found it very difficult to keep the bearing, driveshaft and hub halves lined up on the car so removed the hub and put it all together on the workbench before sliding the whole hub back home onto the drive shaft and ball joints.  Surprisingly easy to bolt back together and now we know how not to do it, the other side should be much easier.  Nice to see shiny things on the car.
Image
 
In no time the old disc was heading binwards and the new one was sitting pretty on the car where it belongs.
Image
 
Next was the caliper.  The piston was seized and over extended but otherwise complete and in good order.  We were particularly surprised when the bleed nipple and flexihose unbolted from the caliper without difficulty.  The old brake fluid that came out was a less pleasant surprise, smelled just like rat wee.  I was surprised there was any fluid in the system at all.
Image
 
The second set of brake pads I bought were correct, happily.
Image
 
They were also very needed.
Image
 
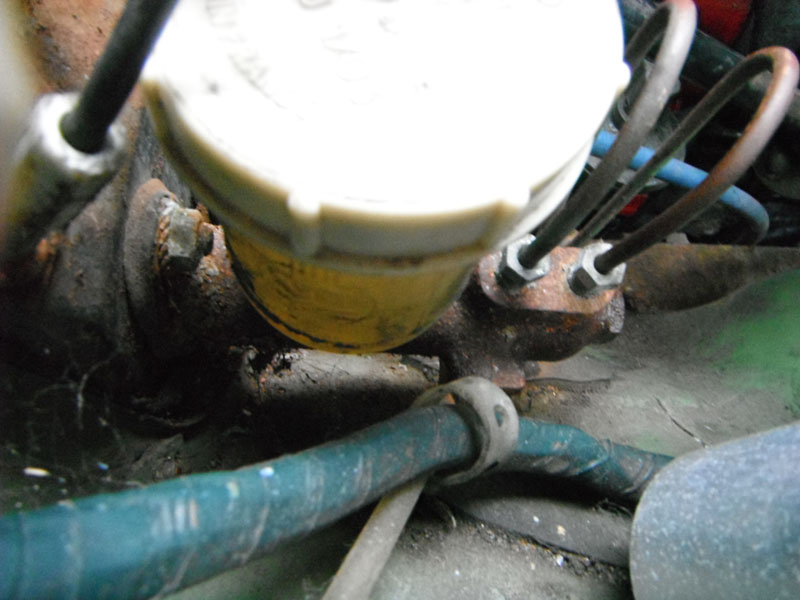
The caliper was taken apart as much as it would go and with some persuasion the piston was convinced to move again.  Another pleasant surprise that.  Before reassembling the caliper we wanted to make sure fresh fluid was getting through the system from the master cylinder.  Filled up the tiny reservoir, which is a challenge because of the various cables that run over the top of it.
Image
 
Gave the pedal a few goes and nothing.  Cracked off the brake lines from the master cylinder and... nothing.  Cracked off the big nut on the end to see if it would at least let all the fluid in the reservoir leak onto the floor but nope, nada, zilch.  That'll be a dead master cylinder then, which is hardly surprising.  I need one like this which has two outlets on the top and one outlet on the driver's side.
Image
 
Image
 
Tidied up, put the wheels back on and left it at that for today.  As an aside, I had difficulty pushing the car today to get it where I wanted it to go, just wouldn't budge!  Guess which moron had left the handbrake on?  Still, at least half the brakes work.
User avatar
vulgalour
Posts: 228
Joined: 05 Jul 2014, 22:32
Location: Stockton-on-Tees and Kent
My Cars: 1980 Austin Princess HL
1987 Citroen BX 17RD
x 36
Contact:

Re: 1975 Renault 6TL - 12/05 Update

Post by vulgalour »

2nd June 2016
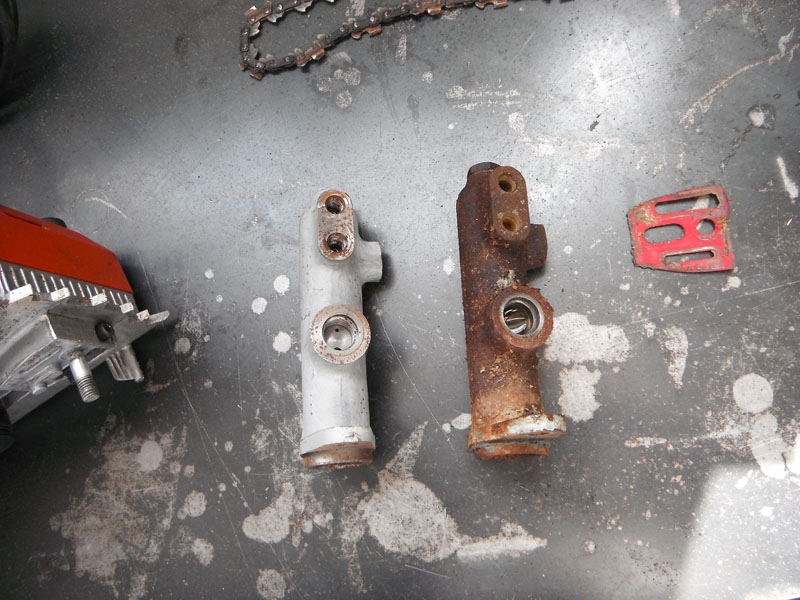
Today I stole a few minutes while having lunch and commandeered Mike into helping replace the master cylinder that arrived this morning.  A fiddly job, made more annoying by a lack of access and, for the lower bolt and pedal plunger assembly needing two people to keep it all lined up and frustration at a minimum. Old (right) and new (left) on the bench, thankfully it is the correct part and they are identical apart from condition.
Image
 
Cleaned the pedal plunger bit up because it looked a bit worse for wear before putting it all back in the car.
Image
 
The brake fluid reservoir was fitted with a new copper crush washer to replace the old one.  Refitting is slightly more fiddly than removal, there's very little space to actually get tools, let alone hands, into the gaps around this part.  All three brake lines reattached without any bother at all.
Image
 
Pedal side of it all went together fairly easily and was given a new split pin.  Pedal actually feels to travel properly now even without fluid in the system, it feels more as a brake pedal should where before it was just sort of floppy.
Image
 
We bench tested the starter motor and it sounds all kinds of broken.  The solenoid isn't activating, the bearings sound like they're made of gravel and it's spinning pretty weakly when it does bother to actually work.  Only had enough time to refit the points but not to gap them yet.  I'm hoping to find some time over the weekend to get the front brakes finished.  Starting the engine is still going to have to wait a while.
User avatar
vulgalour
Posts: 228
Joined: 05 Jul 2014, 22:32
Location: Stockton-on-Tees and Kent
My Cars: 1980 Austin Princess HL
1987 Citroen BX 17RD
x 36
Contact:

Re: 1975 Renault 6TL - 12/05 Update

Post by vulgalour »

3rd June 2016
I had an unexpected half-day today so spent my spare time on the Renault, it's rare I get the luxury of bonus car time.  Decided the best thing to do would be to get the brakes finished and take some pictures to illustrate how the front discs are done.  After removing the wheel and putting it on stands, put the car in reverse to undo the hub nut if you haven't someone to help brace the wheel and then undo the nuts holding the disc to the outer hub.  After that, put some bolts through the holes in the hub so the end of the thread rests on the disc face.
Image

I had three bolts I could use and this makes life easier.  Fit a nut on the bolt between the outer hub and the disc brake.  Working on one bolt at a time, tighten the bolt with a spanner holding the nut to ease the hub apart.  It's steady going, but quick enough really.  Changing discs is hopefully not a job you do that often.
Image

You do need to get the outer hub to move quite a long way and my bolts weren't long enough.  I spaced them out with some sturdy wheel nuts that have a solid dimple in one end and  good flat face the other.  This allowed me to remove the outer hub completely and safely.
Image

With the outer hub off, you remove the old disc, put the new one on and refit the outer hub.  I was quite lucky on this side as the hub halves went together very smoothly.  A little bit of hammering was required to knock the outer hub home but once you've got enough driveshaft thread through you can put the bolt on and tighten it up.  You might need to use the hammer to help a bit as I did on this one but eventually you get the hub safely back together and can then bolt the disc in place.  After that be sure to tighten the hub nut.
Image

With both discs now renewed, the new pads could be fitted.  It's a bit of a faff and I found the best way was to bolt the carrier to the hub with the pads in and then fit the caliper and shims and pins in situ.  The last thing to go on was the dust shield and then the brakes were bled pushing out lots of air and a bit of really disgusting contaminated old brake fluid.
Image

Image

The old pads that came out were very dead.
Image

After getting the fronts bled the brake pedal felt quite good and my brother and I jacked up the rear end to see if they worked on the pedal.  I knew the rear brakes did work on the pedal when it came off the trailer over a year ago but hadn't tested them beyond that.  Happily, both wheels stop satisfactorily on the pedal and the handbrake works, whether it's good enough for the MoT remains to be seen but I'm satisfied that we now have functioning brakes on all four corners.

But wait, there's more!
Image

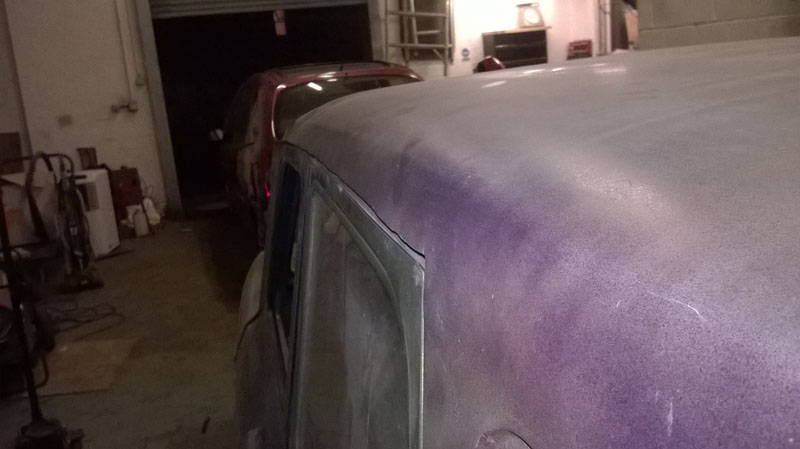
The filler work on the roof was completed and the paint put on.  I've gone for a unique approach of layering different coloured aerosols to make the repaired areas blend in with the rest of the car and not jump out.  It's so effective I'm running with it for everything.  Some dents are left in on purpose because they're part of this car's story and will be a talking point when I get to using the car, I'm sure.  The camera has mostly picked out purple on the passenger side but there's red, blue and beige over the green and blue paint already on the car in this area.
Image

Image

Image

The small bit of damage that was welded on the rear wing was given the same treatment, to good effect.
Image

Image

The driver's side got the filler work finished and the final coat of paint on, orange instead of purple on this side until the orange ran out.
Image

Image

Of note is the small peep/overtaking mirror that I got for very little on eBay.  It was originally destined for the Princess but was far too small so became a neat addition for the Renault.
Image

I think the next job is likely removal and refitting of the windscreen so the reversing light wiring, headlining, rear side windows and dashboard can all go back in as that's the biggest job on the list.  I will attempt an engine start when I have the help available which might be this weekend.  I'm running out of jobs to do, which is very nice.  I have very little on my shopping list too, just two generic exhaust clamps, the headlight and a set of tyres.
Hell Razor5543
Donor 2023
Posts: 13743
Joined: 01 Apr 2012, 09:47
Location: Reading
My Cars: C5 Mk2 VTX+ estate.
x 3007

Re: 1975 Renault 6TL - 04/06 Update

Post by Hell Razor5543 »

That is looking like a very interesting car. It has earned its character, and leaving it with blemishes will leave it with that character.
James
ex BX 1.9
ex Xantia 2.0HDi SX
ex Xantia 2.0HDi LX
Ex C5 2.0HDi VTR
Ex C5 2.0HDi VTR

C5 2.2HDi VTX+
Yes, I am paranoid, but am I paranoid ENOUGH?
Out amongst the stars, looking for a world of my own!
User avatar
CitroJim
A very naughty boy
Posts: 49621
Joined: 30 Apr 2005, 23:33
Location: Paggers
My Cars: Bluebell the AX, Polly the C3 Picasso, Pix the Nissan Pixo, Propel the duathlon bike, TCR Pro the road bike and Fuji the TT bike...
x 6183
Contact:

Re: 1975 Renault 6TL - 04/06 Update

Post by CitroJim »

Hell Razor5543 wrote:That is looking like a very interesting car. It has earned its character, and leaving it with blemishes will leave it with that character.
I quite agree with all James says... Excellent progress too :D
Jim

Runner, cyclist, time triallist, duathlete, Citroen AX fan and the CCC Citroenian 'From A to Z' Columnist...
User avatar
vulgalour
Posts: 228
Joined: 05 Jul 2014, 22:32
Location: Stockton-on-Tees and Kent
My Cars: 1980 Austin Princess HL
1987 Citroen BX 17RD
x 36
Contact:

Re: 1975 Renault 6TL - 04/06 Update

Post by vulgalour »

Crumbs, another busy day on Crapaud. I bought some new spring clips for the sill trims so I could get those back on. The old clips had rusted out for the most part and were a nuisance to remove. The new clips were even more of a nuisance to fit but I persisted and got there. Cleaned off the rust and flakey paint on the sills and then popped one trim on which fitted well enough, pushed the end caps home which have seen better days and this side was done.
Image

The other side it turns out the trim strip is considerably shorter than it should be. I only found this out after fighting with all the trim clips because I'd foolishly assumed it would be the correct length. Never mind, it doesn't bother me, just part of what this car is all about.
Image

Windscreen was popped out. This has to be the easiest windscreen I've ever removed. The seal had some sort of sealant gunge which meant the top wasn't sitting flush with the frame and allowing water to get trapped. The driver's side had loads of sealant for no real reason and the passenger side practically none. The windscreen has been out before as the green repaint was underneath everything. The whole surround and the seal - which is in surprisingly good shape - were cleaned to get rid of the sealant and rust and so we could make a start on the next job...
Image

Fitting the headlining. After popping all the rods into the relevant holes, the rear tension was set by putting the special plastic piece into the grip rod and then pressing the grip rod down where it was lifted from the previous headlining removal. At the front, a little bit of good strong adhesive was applied before putting the tension on and holding it all down with pegs. It works exceptionally well.
Image

Once it's all dried, the excess fabric and pegs are removed and then the side tension can be set.
Image

There was a couple of inches of excess fabric to remove before I could tuck it away into the grip rods and to prevent puckering on the seams, the roof bow pleats were split (on the fabric, not the stitches) to allow the new headlining to fit smoothly. Here it is before trimming and after front-to-rear tension has been set.
Image

I had thought some of the fabric needed to go in the rear side window holes as when I removed the old headlining that's where it was. However, the grip rod runs all the way to the back so I put it back in there which is much neater. It also reveals where the respray was done by masking off the old headlining but removing the rear side windows. To fit the fabric for side tension you get a large, blunt screwdriver and, working from the seams, push the fabric into the grip rods. If any of the grip rods (I've typed grip rods too many times, it's lost all meaning now) need it, gently tap them down to hold the fabric. It's a really, really fast way of doing a headlining, I like it.
Image

Repeat on the other side until complete. The finished article is really satisfying and it's made the interior a nicer place to be.
Image

With that done, attention could turn to refitting the side windows. I managed to fit this one back-to-front on the first attempt so it had to come out to be refitted, but it was done with a little grunt by my brother and I.
Image

The other side got the same treatment. This went much easier when we found a length of suitable cord but it was still a difficult window to put in due to the shape of it.
Image

Finally, the windscreen went in. It sits in the frame much better than it did before it was removed. I didn't have the special tool for fitting the chrome trim but I do have a tried and tested technique using fingers and a screwdriver carefully. I also found climbing onto the bonnet of Renault 6 from the side is very difficult because it tips much more than you expect.
Image

With all the glass in and the headlining fitted I faffed about refitting the dashboard and then the mirror - which I cleaned the stem on since it had too much green paint on one side - and the visors.
Image

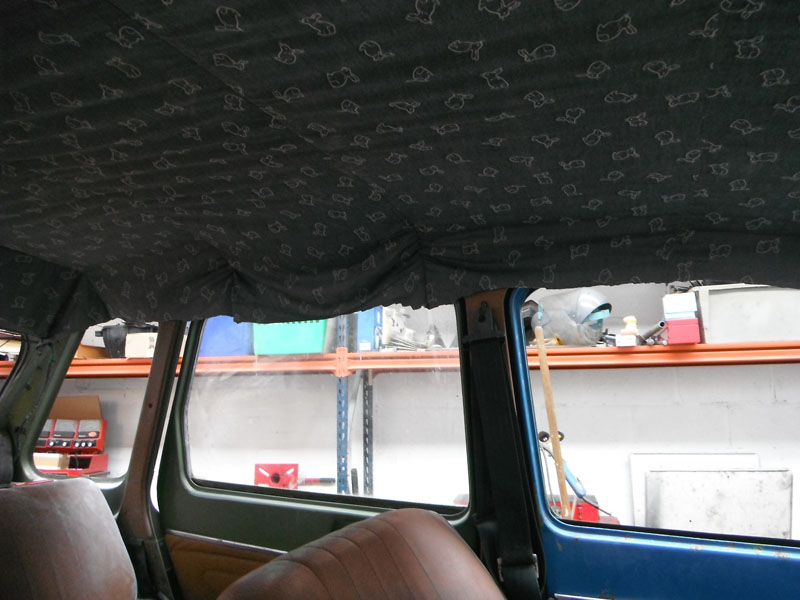
Another shot with flash, so you can see the rabbits.
Image

Mike was in briefly and ran the wiring for the reversing lights, we just need to wire up a switch to operate the existing ones or find some that work from the non-powered switch in the Renault's gearbox. The wiring is at least in for the reversing lights now which makes them easier to sort in the future. Happily running out of jobs to do now.
Post Reply